
Today I'm going to give detailed instructions on my method of making bread. It's not the only way to make bread, but it makes very good loaves with minimal time and effort. My recipe comes primarily from three sources: the french bread recipes in "Mastering the Art of French Cooking Vol II" and "Artisan Bread in 5 minutes a day", as well as trial and error. As usual, the Julia Child recipe has very good instructions, but is far too complicated for everyday use. Anyway, here goes;
1. Put the following ingredients in a Kitchen Aid mixer with the dough hook attachment and blend for a few moments:
8 cups flour (about 2 pounds)
1.5 T salt
1 scant T dry yeast

Initial mixing of dry ingredients
Notes:
- Julia Child's recipe calls for something like 2 T salt, which makes a noticeably salty bread. You may like that, but I don't care for it.
- I never bother proofing yeast anymore. I've never had a recently purchased dry yeast culture fail me when it is kept in the fridge. Sometimes people kill their yeast by proofing them in water that is too hot.
- I use iodized salt in bread and non-iodized for everything else. No reason to tempt the goiter fairy.
- There are many options for the flour portion of the recipe. Our main flour is white unbleached and almost always will make up 50% of the flour in the recipe. Sometimes I make plain white bread, which rises very well and has a pleasant chewy crumb. Most of the time I use 50% white and 50% whole wheat flour. This still makes a very light loaf, but is a bit heartier. You can make a good loaf from 100% whole wheat, but it will not be as light using this recipe. Assuming you use white flour as the base, you can actually use up to 25% of any other grain and produce a good loaf. My favorite addition is rye, but I've also tried grits, oats, pearl barley, flax seeds and pretty much whatever else I have had around the kitchen at the time. Do what suits your taste.
2. Add water gradually while mixing on low speed, then continue to knead for 3-5 minutes
This is a step that requires experience. You will need to add probably between 3-4.5 cups of water to make your dough, but the amount of water required will vary depending on the flour (and even the water) that you are using. Add the water gradually. You want a pliable, moist and well mixed dough at the end, but it shouldn't be slumpy or too sticky (sticky wet dough can make a delicious loaf, but it will probably won't be so pretty). Add enough water before kneading to make the dough seem a little too wet, then knead until the dough absorbs that moisture and gathers around the dough hook, cleaning up the mixing bowl in the process.


The dough has come together and 'cleaned' the bowl
3. Allow dough to rise covered in a warm location
- I leave the dough in the mixing bowl for the rising. I make dough sometime on Saturday and make bread sometime Sunday afternoon.
- I don't bother punching down the dough unless I notice it overflowing the mixing bowl. Deflating the dough is supposed to redistribute the gas-filled holes in the dough and make a more even loaf.
- Rising time can vary depending on your needs. The longer you let dough rise, the more flavorful it will be. If it is too hot or if you don't have time to get to making the bread, dough can be left to rise in the fridge overnight or for up to a week I wouldn't leave the dough at room temp for more than 48 hrs.
- I also wouldn't try to make bread with a rise time of less than 8 hrs. The rise time develops the flavor; if you have less time than this you might as well make a quickbread.
4. Form 3 loaves and allow to rise an additional hour. For the second half-hour of the rise time, pre-heat the oven to 400-450F.
-This is an essential part of the bread making process. The goal of this step is to create an loaf that will rise in the oven and create an attractive, even, light loaf without 'blow-outs' due to rapid rising in the oven. There are a lot of loaf shapes, but the overall goal is to create a continuous envelope of gluten around the loaf, sometimes called a 'cloak'. I've included a video of me making round loaves.
-The additional rise time is also essential. This allows the dough to relax enough to expand rapidly in the oven without blowing out.
- After you get the dough out of the bowl onto your work surface, immediately wash the mixing bowl. This makes cleaning a lot easier.

5. Cut top of loaves, place in oven and bake at 400-450F for 25-35 minutes, depending on your oven.
- Make 5-7 slits in the top of the loaves (a serrated bread knife works well). This step also prevents blow-outs in the loaf. For some reason, making the slices at a 45 degree angle to the top of the loaf seems to make a prettier end product.
- There are a lot of variations in the way people bake bread. Some people want a blazing hot oven. Some people place a tray of water in the oven to create a steam bath for the loaves, which they think helps the dough to expand without cracking. Some people start the oven very hot, then cool it off. I don' t bother with any of this.
- I do bother with using a pizza stone in the oven. I think that having a good hot stone in the oven makes for a light, even loaf. We have a large stone that sits in the oven pretty much all of the time.
- When the bread is done, the loaves will be brown on the exterior and have a hollow sound when the bottom is tapped.

6. Allow the bread to cool on a rack.
- Properly cooled bread will have a better interior texture
- Invest in a breadbox. Your bread storage location should allow enough air to circulate to discourage mold growth, but be closed enough to keep the loaves fresh. I'd say the breadbox probably extends the fresh life of our bread by maybe 1/3rd.

- I leave the dough in the mixing bowl for the rising. I make dough sometime on Saturday and make bread sometime Sunday afternoon.
- I don't bother punching down the dough unless I notice it overflowing the mixing bowl. Deflating the dough is supposed to redistribute the gas-filled holes in the dough and make a more even loaf.
- Rising time can vary depending on your needs. The longer you let dough rise, the more flavorful it will be. If it is too hot or if you don't have time to get to making the bread, dough can be left to rise in the fridge overnight or for up to a week I wouldn't leave the dough at room temp for more than 48 hrs.
- I also wouldn't try to make bread with a rise time of less than 8 hrs. The rise time develops the flavor; if you have less time than this you might as well make a quickbread.

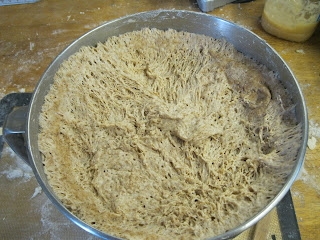
Dough after rising
-This is an essential part of the bread making process. The goal of this step is to create an loaf that will rise in the oven and create an attractive, even, light loaf without 'blow-outs' due to rapid rising in the oven. There are a lot of loaf shapes, but the overall goal is to create a continuous envelope of gluten around the loaf, sometimes called a 'cloak'. I've included a video of me making round loaves.
-The additional rise time is also essential. This allows the dough to relax enough to expand rapidly in the oven without blowing out.
- After you get the dough out of the bowl onto your work surface, immediately wash the mixing bowl. This makes cleaning a lot easier.

Dough cut into three parts
A video demonstrating loaf formation
- Make 5-7 slits in the top of the loaves (a serrated bread knife works well). This step also prevents blow-outs in the loaf. For some reason, making the slices at a 45 degree angle to the top of the loaf seems to make a prettier end product.
- There are a lot of variations in the way people bake bread. Some people want a blazing hot oven. Some people place a tray of water in the oven to create a steam bath for the loaves, which they think helps the dough to expand without cracking. Some people start the oven very hot, then cool it off. I don' t bother with any of this.
- I do bother with using a pizza stone in the oven. I think that having a good hot stone in the oven makes for a light, even loaf. We have a large stone that sits in the oven pretty much all of the time.
- When the bread is done, the loaves will be brown on the exterior and have a hollow sound when the bottom is tapped.

Cutting 'speed holes' in top of loaves
6. Allow the bread to cool on a rack.
- Properly cooled bread will have a better interior texture
- Invest in a breadbox. Your bread storage location should allow enough air to circulate to discourage mold growth, but be closed enough to keep the loaves fresh. I'd say the breadbox probably extends the fresh life of our bread by maybe 1/3rd.

The finished product
Have fun!
No comments:
Post a Comment